You will get all important Gmail tips and Tricks 2020. Tricks to use Google Services wisely. We shall reveal gmail tricks one by one and with detailed step by step analysis to make your day simple and easy. Gmail short cuts will also be discussed thoroughly.
How To Add Multiple Gmail Accounts
Simple Steps to Add Multiple Accounts on Gmail App
STEP – 1 : Open Your Gmail App
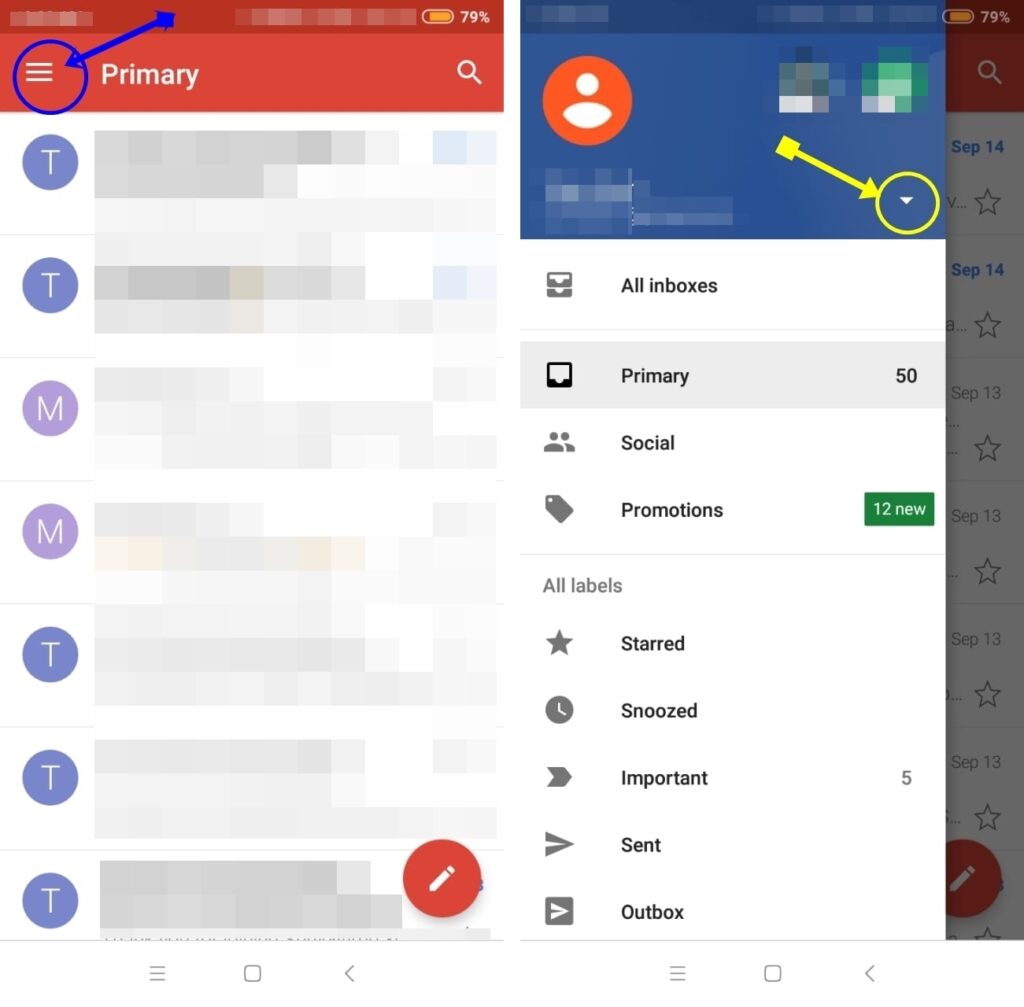
St – 2 : Tap on Top left corner (3 Bar Menu – See Pics – 1)
STEP – 3 : Now on Next Page, Click on the Small Drop Down (See Pics – 1
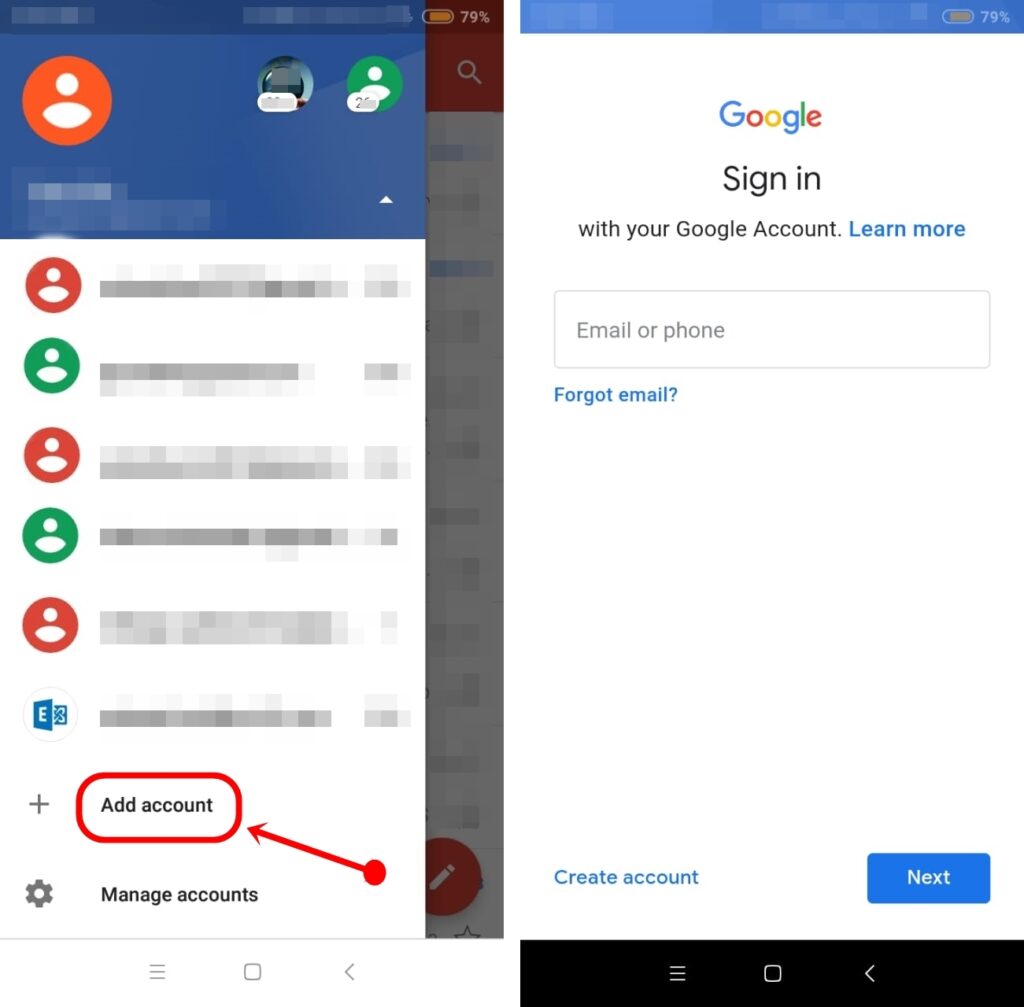
STEP – 4 : Then Scroll Down to the Add Account , located at the bottom. (See Pics – 2)
STEP – 5 : On Next Page, Click Google, or Any account
STEP – 6: Now, Login with your Gmail or Any Account you want to add.(See Pics – 2)
STEP – 7 : That’s it!! You are ready to Use your new account. You will get notification for all the emails IDs added under this app.


You can also play our daily quiz show to earn real money. No joining fee, free entry for everyone.
Now Let’s talk about the unknown Gmail Tips and Tricks in details. First take a quick look on some features you can use on Gmail. The below are available on the Setting icon of Right Side top corner of Browser(Computer/Laptop). These are some of quick tips,
- Mail box lay out change – Default, Comfortable and Compact
- Inbox Type – Default, Important First, Unread First, Starred First, Priority Inbox, Multiple Boxes
- Reading Pane – No Split, Right of Inbox, Below Inbox
- Email Threading – Conversation View – Group emails of the same topics together.
DO YOU KNOW?
- You can change theme options in Gmail
- Video call or Join a meeting
- You can add Multiple Gmail Accounts on a Single Gmail App and can select one Inbox Mode as well.
- Chat using the hangout option.
- You can mark, Delete, Archive or Snooze an email by just hovering the mouse on that email(Web Browser View using Laptop, Compter)
How to Insert Table in Gmail
In this segment we will tell you how to insert table in gmail. Though Gmail has not yet introduced a direct method to create a table, we will guile with simple steps on how to create one easily.
This feature is not very difficult, but Gmail surprisingly not given that option in the compose mail section. Follow below alternate ways to insert a table to your gmail text body.
STEP – 1 : Start Composing an email
St – 2 : Open excel/word on your computer/laptop
STEP – 3 : Create a table with required number of row and columns. (You can’t add or delete row or columns later)
STEP – 4 : Copy the table and paste it onto the gmail. You are done!
What is GMAIL Snoozed ? – Gmail Tips and Tricks
Gmail Snoozed is an interesting feature for snoozing mails on inbox or sent items or even draft messages. Steps for How to Snooze Emails on Gmail;
Step-1: After login to your gmail, Click on tick box of any mail from inbox/sent/draft
Step-2: Once you click on the tick box, Snooze option will come on top of the mail box where delete and other options are displayed.
St-3: Now Click on Snooze, and then a calendar with date and time will be pop-up!
Step-4: Set the Time and date when you want to see that particular mail and click OK/Submit.
That’s it!! You have successfully done the Snoozing. If you have entered wrong date or time by mistake, then undo it by just clicking on the on-screen message immediately(It normally comes left bottom corner or gmail Web view)
Google’s New Storage Policy
Google has some policy changes regarding the trash/deleted items and Storage related terms and conditions. People are in confusion over this latest changes to Google’s policy. We have decoded the policy change in simple and understandable words.

Key Points of Google’s New Policy
- 1st June 2021 – New Policy will comes into effect
- New Policy applies to Google Photos, Google Drive, Gmail, Docs, Slides, Google Sheets, Google files and Google forms.
- If You are inactive continuously for a period of 2 years or 24 months, Then Google may delete your respective account in which you are inactive(Not all the account).
- It won’t affect you if you are inactive for last 24 months, as thenew policy will be implemented from June 1st 2021.
- So, the inactive policy will apply from 1st June 2023. Before that you should at least login to all your accounts separately.


